New Paper and Silk Lamination Project: Wild Cotton

Last year, the year I didn’t blog, was hell.  But I did manage to take photos then with the idea I’d do art again one day. I took this photo at Sabino Canyon last October, during an unusual fall wildflower bloom. This is wild cotton, and for more info on the plant check out this helpful blog:

wild cotton photo for blog

I’ve blogged before about a very cool technique to make fabric, using color photocopies and transferring the pigment from the copy to fabric. It’s been ages since I’ve done any art, and the time finally is right, so since getting back from Santa Fe I’ve been working on this project. I took the above photo, along with a few others, and made photocopies which I then turned into a collage. Here is the roughly 18″ x 24″ collage outside ready to be laminated to silk. I like to work outside for this part of the process as it can be messy.

wild cotton paper lamination 1

I then pinned silk organza over the collage, and used some tape as well.

wild cotton paper lamination 2

I then screen-printed acrylic gel medium over silk-covered collage; and then I quickly rinsed off my screen and squeegee, as acrylic gel medium dries super fast. The collage dried in about 10 minutes in our hot summer sun. The next step is to remove all the paper, so that all is left is a lovely piece of silk—with a collage transferred on to it. I start the paper removal process manually; this is the piece looking at it from the back. You can see all the bits of masking tape used to adhere all the little pieces of photocopy paper together in the collage:

wild cotton paper lamination 4

Once I’ve pulled all the paper off I can by hand, the piece is soaked in cool water for about 10 minutes, and then I use a scrubber to gently remove the paper. Gently. I’ve scraped a hole in silk before so….be…..careful….when….scrubbing! And note the sieve. Personally, few things drive me nuttier than wet paper. It’s gummy and sticky. After a little bit of scrubbing, the fabric goes back in a tub of cool water for a rinse, and then is returned to the scrubbing table for more scrubbing. I pour all the used water through a sieve to strain out the paper and dispose of it properly. Never be tempted to dump any of this stuff down your sink. It will clog in a way you likely can’t imagine so don’t do it!

wild cotton paper lamination 5

This is the finished piece:

wild cotton paper lamination 3

I am inspired by how translucent this piece is, and it’s an impetus for me to use this technique for a piece I hope to finish in time to enter in a nationally juried show. More on that next time!

Screen Printing Saguaros

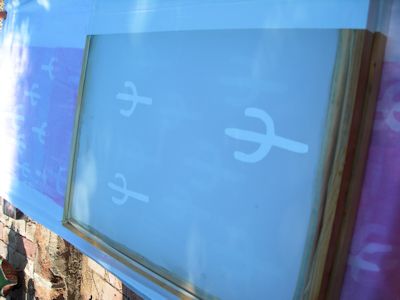
I need some fabric for the border of my quilt; I spent the weekend screen printing, and while I wanted the fabric dark, I started out light with a dark pink. Above, the first run of saguaros. Below, two silk screens with saguaros cut out of contact paper stuck; the screens are the same size, but the arrangement of the saguaros is different on each one.

I then did a run of blue, then gray over the pink:

This is how the fabric looked after the first run of gray, it’s the vertical piece on the right:

I thought it wasn’t dark enough, and printed another run of saguaros with what I thought was a darker gray, but it didn’t make too much difference; here’s both vertical pieces auditioning on either side of the quilt top, along with some fabric strips auditioning for window frames for the 6 windows:

I think I’m OK with the vertical border fabric as it is. Which is another way of saying I’m done screen printing out in the heat on my patio. The next step is to put it all together, and then I have to decide what colors to use to frame the windows; here’s a few strips I’m trying out. My sister had the great idea to alternate the colors and widths of the fabric strips for the windows.

Lots to do. More soon, when I can tear myself away from obsessive/compulsive fabric auditioning and sewing. It seems I just can’t stop trying out yet more colors and patterns to see what will work best. This is where having lots of fabric may be my doom.

Shadow Fabric Part 2

I took the fabric I made last weekend (see previous post) and pinned it down today and stuck some more contact-paper shapes on top. Then I applied another layer of screen-printed dye paste. This is how it looked before the dye:

A close up…I’m a bit tired of cutting out the same shapes!

Once the first layer of dye dried, I carefully unstuck the shapes and reapplied them in different spots on the fabric and screen-printed on more dye. Here’s the yardage drying out on the patio. I don’t “proof” or “cure” or “batch” anything; most advice and tips on dyeing fabric calls for the dyed fabric to be sealed in a plastic bag overnight to get the maximum amount of dye.  Sometimes I’ll let something sit that has a lot of nuance; but in this case, after a few hours in the sun this fabric was tossed in the wash. Once dried, this is how both pieces of fabric look:

Here’s a close up:

And another close-up:

I’m generally quite pleased. I’m able to see how everything is going to fit together now; I just need to keep at it and hope to have this project done by the end of summer.

Honey Bee Fabric

One of the women in my quilt group works with honeybees in a government lab; she likes bugs. When there’s a birthday in our group, that person gets a piece of fabric (generally a fat quarter) in their favorite color or style. Diana requests fabric with bugs. I totally spaced out her birthday last year, so I thought I would try making her something this year for this week’s meeting.

First I drew a bee with pencil, so I could make a thermofax screen:

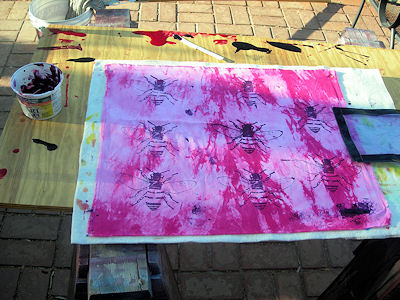
Here you can see a piece of my hand-dyed pink fabric pinned down to some foam core out on my patio; I’ve just screen printed the honeybee shape on the fabric, and you can see the small and rather sloppy screen–with a “frame” made of duct tape– off to the right. I’d say the bees are about 3″x5″.

To make up for missing last year’s birhtday, I also screen printed a similar-sized piece of orange fabric using fuschia dye this time:

I kind of sponged around the areas where I glopped on some dye paste during the printing process. Sloppy! I figure this fabric could come in handy for some picky-piecing, if one wanted to highlight bees for some reason in one’s quilts.

Screen Printing Revisited

Finally, back to an art quilt project. I have this idea of a piece about the January 8th Shooting in Tucson.

I made print paste mix yesterday to get ready for screen printing, as it’s best for the mix to sit 24 hours before use; it’s just sodium alginate, water and some urea. I’ve read several recipes that call for 8 Tablespoons of sodium alginate per gallon of water (a whole gallon is made because it stores well in the fridge); however, this is what the paste looks like with those proportions:

Yep. Very runny for a paste that you’re supposed to actually drag across a silk screen. So I added sodium alginate, increasing my total number of Tablespoons to 11:

And while it thickened some more after this effort….it was still too thin. I’m going to add 14 Tablespoons next time and see if I actually get a paste.

I then cut out some stencils of human shadows; I had this idea of creating fabric of the silhouettes of a man, woman and child to represent the different people hurt and killed at the shooting:

I settled on the shapes of a girl and a man; although it’s not my intention, I think this creates a more sinister feeling, and ultimately this may be very good for the piece, given the subject matter.

Here are the freezer paper cut-outs ironed on to the back of a silk screen:

Here’s my “outdoor studio”: plywood on top of sawhorses makes for my work space, and the patio table is my work area. Check out the wildflowers in the background!

Here’s one run:

Unfortunately, the freezer paper stencils didn’t stay ironed-on to the silk screen; they remained in place for the first run, then started remaining stuck on the fabric midway through the second run due to the wet conditions and the thin print paste mix. I just carefully unpeeled the stencils and stuck them back on the fabric. Here’s what the fabric looked like, wet, after 4 runs. I seem to remember from past practice that the fabric really can only absorb the dye from 2 runs, possibly 3 but not much.

I should make it clear that I have poor screen printing technique, and that I do all kinds of short-cuts and chaotic things while I print:

Here’s the finished fabric; it’s pale (I used very old dye to see if it still worked, I used Procion MX cold water dyes I’d mixed 4 months ago and left in the fridge, just to see how they’d perform:

I think the shadow idea worked well; the shapes are distinct. I like the colors, too, but I think I’ll mix fresher dye next time:

New Thermofax Fabric

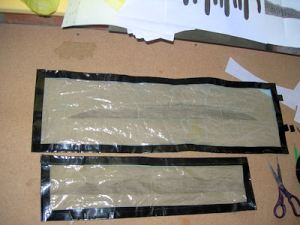
Below is a not-very-good photo of my first thermofax screen; the smaller, bottom screen is the first screen, and the one above it has the same image but is larger–and, more importantly–has a blank space on the very left before the design starts, and this space is necessary so you have somewhere to put a pile of thickened dye before you scrape it over the screen. I didn’t put this blank space–kind of an improvised “well”–on my first screen, which is why it was so hard and frustrating to print.

Here are a couple of new screens I made of saguaro cactus shapes; you can see the black and white photocopies I used to make the screen on the right.

This is what I jokingly refer to as my “wet studio”: my patio table and a bunch of buckets, old towels, yogurt containers and thickened dye; here I have the screen with some dye on the left, ready to be squeegeed:

This is what the print looked like:

And here I’m starting the next run…

…which looks like this:

Below, the fabric after multiple runs:

I also did yet another layer of mountain-shapes after I was done printing the saguaros, here are all four panels getting a bit of late afternoon sun before they go in the washer:

This is a part of the mountain fabric, as it looks now…

…and here is the saguaro fabric:

Not bad, I think. I’m slowly getting the hang of printing with these screens.

Thermofax Fabric

Still working on getting the hang of screen printing with thickened dye and a home-made, duct-tape framed thermofax screen: today I took the Catalina Mountain fabric I’ve been working on, and screen-printed more mountains on top. Here’s one layer, drying:

And another:

I let the fabric sit in the sun for an hour or so, washed it, and then went through the whole process again. Here’s the fabric drying (again):

This is what I have so far, 2 pieces of fabric; the thickened  dye is always way lighter dry than it appears wet:

Here’s a close up; I’m happy with the results, it’s cool how you really can see the multiple layers of screen-printed dye:

Paper and Cloth Lamination Project

Last Christmas (!) I got myself a copy of the very aesthetically pleasing book  Paper & Metal Leaf Lamination: A Mixed Media Approach With Cloth, a joint venture by well-known fiber artists Jane Dunnewold and Claire Benn and Leslie Morgan.

I’ve been meaning to give some of the techniques a try; I finally got around to it the past few days after work. Above you can see the basic ingredients: book with instructions, bottle of acrylic gel medium (not inexpensive, it’s from France), silk screen and squeegee, and sheer piece of fabric–in this case, silk organza.

My goal: use gel medium to transfer photocopied images onto fabric, creating a sheer, durable, laminated piece of fabric with (ideally) cool, ghostly images. The first time around is always a sample; but I still give a sample my 100%!

With my supplies above, I cut up photocopies I made of photos I took during last months’ trip to Washington D.C.; the photocopies are over a week old, and supposedly they make a better transferred image when the ink on the copies has had a week to “cure”.

I arranged the photocopies on a piece plywood that had several layers of polyester batting and cotton flannel stapled on top; then, I placed the organza on top, and per the instructions in the book, diligently pinned the silk down, stretching it tight over the collage.

Then, I took the board outside in the blistering heat of the day; I worked under my patio umbrella. Here you see the collage under the fabric, the silkscreen, squeegee and acrylic gel medium. Also, a plastic tub of water to immediately wash the tools–that gel medium dries fast, and permanently. I silkscreened about half the bottle of gel medium onto the silk, making sure that the fabric was thoroughly saturated.

It took just 20 minutes for the piece to dry; here it is on my ironing table, paper stuck to fabric:

I pressed the silk/paper sandwich on the highest setting, using baking parchment so nothing got scorched:


Once heat set, the piece was stuck in a bucket of cool water for 20 minutes to soften the paper for easy removal:

Here’s the wet fabric-paper sandwich, and a green brillo-type scrub pad. Most of the paper just peels right off, in messy papier-mache blobs; the gummy residue of the paper needs to be scrubbed off, firmly but gently so as not to scrub a hole right through the silk (I did make one small hole due to over-zealous scrubbing). You can see some of the small wet-paper blobs below:

Once all the paper is removed, and the gummy stuff scrubbed off, I tossed the fabric into the washer with cold water for a quick rinse; when I took it out, I lightly pressed it. Both sides of the silk are free of paper, just the image from the ink is left behind.  Here is the finished sheer piece,  the “wrong” side showing (i.e. not the side that had the paper directly touching it) hanging on my white design wall:

And here it is over some blue fabric, just for a different perspective:

I don’t know how I feel about this technique at this time. I think I’ll try it again. I’m not really fond of altering the “hand” of the fabric– maybe I’m a purist, or, just not adventurous!–and the gel medium significantly alters the hand of the silk, to the point where it now feels like a restaurant menu. I noticed in a few places there were bubbles on the transferred images, so I think I may have used too much gel medium in certain places.

The reason I’m hanging up this piece with the wrong-side showing is because I want to read the text from my images. The ink from the photocopies is lifted onto the fabric where the fabric touches the ink; so, on the “right” side the ink will be stronger, and the text (and all images) will be backwards.

If you use this technique to transfer photocopied text, just remember that the paper side of the fabric will have backwards text once you’ve scrubbed off the paper, and you will only be able to read the text from the “wrong” side of the fabric, and the wrong side is perfectly fine, it’s a bit more “ghostly”; if you want to read the text, you will need to consider this and consider the “front” of the piece to be the fabric-side. I think this isn’t a big issue if you’re using sheer fabric; but, if you transfer images onto a more solid piece of fabric, you will most likely have no choice but to use the paper-side, and your text will be backwards. Which is not bad or anything. It’s just something to consider.

My New Art Quilt: Sonoran Desert Wildflowers

I started this art quilt project  late last spring. Right after I started, my uncle was diagnosed with stage 4 colon cancer; he lived for 2 months after that, and I spent my free time visiting him until he died. Only recently have I picked up where I left off. I have this idea of a big brightly colored art quilt with pink sand verbena and yellow and orange desert poppies and a bright blue sky with cirrus clouds. That’s the general plan and color scheme. Overall size will be something like 70″ x 40″.

Here’s some sand verbena from my wildflower perennial bed:

sand verbena resized


I cut verbena shapes out of contact paper, based on the photo; contact paper is the stuff you use for shelving in your cabinets.

DSCN1511


Here are my plywood boards w/poly fleece stapled on top; I took these outside and stapled my fabric on top….

DSCN1509


I peeled off the adhesive on my verbena-shapes and stuck them on the fabric stapled on the boards, then screen printed thickened dye on the fabric….then I washed the fabric and did it all over again a few times.

You can see some of the finished verbena-fabric here on my “design wall”–just fancy talk for a big fabric covered bulletin board where I can hang fabric up to “audition” for whatever project I’m working on:

screen printed fabric

Now the question is what to do with all the fabric! Time for some sewing experiments…..