Update on Projects: Lots of Pans in the Fire

As Murphy said, If something can go wrong….it will. This past 2 weeks I’ve run into a variety of mechanical snafus: my sewing machine had to go back to the shop, again; I got a new front door installed, but in the process my front door light now doesn’t work; my car broke down today (the alternator, I think).

That said, I’ve been working away at some small projects.

I’m not sure how I feel about building frames; my sister gave me the idea to build a couple of right angles as a sort of “template” for building picture frames. Here’s the template, which is 2 right angles squared with a roofing triangle, and glued to a piece of plywood:
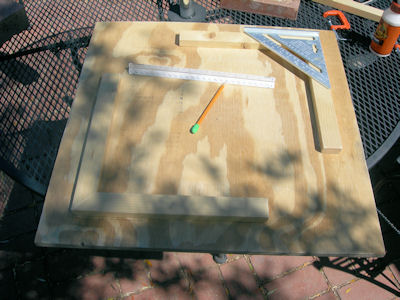
I then cut out the pieces for the frame, which if I decide to glue it together, will be glued and clamped one right angle at a time around the template above:
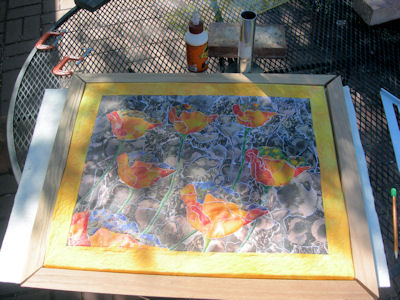
I don’t know how I feel about the frame at this point. I guess I felt a frame might make my fabric art look more legitimate; but now I think it may look better if I put a fabric binding on it and hang it from a hanging sleeve, like my other pieces.  I mean, is a frame really necessary?

I’ll be thinking about that question! Luckily, I can experiment; nothing’s set in stone.

Meanwhile, our 4–6 weeks of spring here in Tucson is in full bloom, at least my patio says so….

…and my wildflowers say so too! I have some tidying up to do and new plants to put in the ground before scorching temps hit next month.

The next few days I’ll be working on some curtains for my friend Mark, who’s in a wheelchair now for 10 years after a bike accident; he loves the Beatles, wants curtains for 2 windows with some Beatles fabric, and right now the project is a pile on my ironing board:

The San Francisco Giants meet the AZ Diamondbacks this weekend, and those games are on the part of the TV that’s still free…..so looks like I’ll be watching baseball and sewing curtains this weekend!

St. Patrick’s Machine Quilting: Not Exactly Green Beer

Well it’s St. Patrick’s Day and I’m NOT playing any fiddle tunes tonight. My tell-all of my experience in Tucson’s dysfunctional Irish music community will be coming up in a future post; right now, while it’s hard to tell in the photo below, I just quilted around all the poppies in this latest piece:

Here’s a close-up:

And here’s the back:

I think I’ll just stipple the border. Then try and frame it. The quilting line really brings out the shape of the flowers. I used my walking-foot, as free-motion–as I mentioned before–didn’t work on this surface, thus limiting what I can do with the quilting line. But I will be able to use the free-motion foot on the border, which is just plain cotton fabric, nothing laminated.

Art Quilts, Meet Power Tools

I want to try and frame some of my newer, smaller art quilts, given that they look painterly; and if I’m successful, maybe I’ll even try framing larger pieces! Given my DIY sensibilities (why buy it if you can make it), I priced out entry-level compound mitre-saws and picked one up at a local hardware store yesterday morning: this is the tool that allows one to cut wood at a 45 degree angle, what’s needed to make frames for art.

Power tools freak me out. My mother’s father was a very gifted carpenter, as are his sons; they built the church at a nearby monastery in St. David, AZ. You’d think some of the handiness would be passed on to me. Perhaps. Sadly, when I look at power tools what comes to mind isn’t carpentry but war and torture; I’m not trying to make this political, it’s just sadly a morbid train of thought I can’t stop thanks to our war in Iraq.

But, you know, I want to make frames for my art quilts. Dour thoughts aside, I really liked firing up my new saw and hacking away at some molding strips I got at a local lumberyard.

Here’s my first set of stretcher bars!

The plan is to stretch the poppy art quilt over the bars, staple, and then build a frame to go around the stretcher-bars. To that end, and thinking optimistically, I drilled 2 holes on the top and bottom bars, so that I can screw the stretcher bars to the frame I eventually build.

I’d like to thank Jerry, the Sixty Minute Artist; his blog post about building frames for his paintings gave me some good ideas. Thanks Jerry!

Machine Quilting Laminated Silk Fabric

OK. I think it’s going to take me some time to figure out how to successfully machine quilt the laminated silk fabric I’ve made recently.

Here’s the piece, I added the border yesterday. What you’re looking at is 2 layers of fabric, the somewhat stiff laminated silk on top of a piece of yellow-ish/orange fabric; you can kind of see that the black and white areas have a bit of a rosy glow, that’s the fabric underneath.

I then added a 3rd layer, the batting; this is the piece, wrong side up:

I plan on stretching this over stretcher-bars (so it will look a bit like a canvas), so I’m not quilting the whole top, and I’m leaving some fabric un-quilted on the side (the yellow fabric you see) so it will be easier to stretch and staple over the stretcher-bars.

I then put on a final layer of loosely woven muslin, over the backing, to make the quilt sandwich: 4 layers total.

Then I tried to quilt it.

Above, you can see that there is an OK quilting line along the green stem; I used the walking foot for that, and the stitches are OK. In the middle, you can see yellow-ish holes where I pulled out the thread: this is where I tried to stiple using the free-motion foot.  The thread kept breaking and it was driving me nuts; changing the needle, the tension, the thread did nothing. I think there are a) too many layers to free motion (next time I’ll skip the muslin backing so I just have 3 layers to quilt through, and b)the laminated fabric doesn’t have any “weave” so it’s kind of like quilting through a super tight-woven fabric like cotton sheeting, which is impossible. I did that once. Never again. It could also be my machine.

Anyway, since this fabric doesn’t have a “weave”, when I pulled out the stitches, holes were left behind.

I knew this was going to happen; but I hoped that the quilting would go better. I pressed the fabric with some steam, under parchment paper, and at least the holes melted a bit and now aren’t so obvious:

Tomorrow I’ll quilt the rest of it, though I’m just using the walking-foot, which can outline shapes but nothing more. Free-motion is out. Until I figure out how to make it work.

Tomorrow I also plan to set up my new mitre-saw: power tools make me nervous, but I want to try and make frames for these pieces. When something is framed it immediately becomes more of any art object. Unfair, but, that’s just how it is.

Oh, Saguaros: Not Fade Away!

I had mixed results with the whole photocopy-collage-silk-fabric lamination thing.

Here are both collaged pieces pinned down under 100 silk organza. Yummy fabric.

After using a silkscreen to apply the gel medium, then drying, pressing, soaking and scrubbing the fabric, I was left with this faded disaster:

This is the fabric-side (as opposed to the paper-side) of the fabric. It’s so dim-looking,  I’m disappointed after all that glue-sticking. When I applied the gel medium on Saturday, the color photocopies in the collage were mostly just a few days old. I read in the book by Claire Benn and Leslie Morgan on the topic that it’s best to let color photocopies “cure” for at least a week for using them. Now I know why; I thought I was exempt from this recommendation. So, I think that’s one factor.  The photocopies I used in the more successful prickly pear piece in January were 2 months old.

The other issue is perhaps the subject matter itself. Saguaros aren’t generally a bright, vibrant green; they’re looking especially parched now due to the rainless winter here, but even after inches of rain, their green is still not bright, at least not consistently. Their color isn’t enough of a contrast with the black-and-white photo background.

The poppy piece fared a bit better, this is the “fabric-side”:

This is the “paper-side”: all the paper is scrubbed off, what you see is just pigment, but the color is brighter and I think the fractured effect is a bit stronger.

And this is the same side, on top of some dyed orange fabric, instead of the white above; this of course brightens things up and will likely be what I decide to use for the backing.

Next time I spend hours on a collage I’m using photocopies that are a month old for sure. Time to get thee to a photocopy shop now, so I can start another collage next month.

Third Silk and Paper Lamination Piece: Saguaros

I’m almost done with the last of 3 silk and paper lamination pieces: this one will be saguaros. I worked on it this week after work and then this morning. I’m still stunned that it takes so long to rip up paper, apply glue-stick and then adhere to paper; seems like it should be done in no time but NO…

I’m taking a break right now from finishing it, so tomorrow I can take both this one and the poppy one outside and screen-print on the acrylic gel medium. Tonight it’s me, a glue-stick, a stack of shredded paper on my ironing board, my dog and C-Span. Now that is commitment.

My pattern is based on this photograph; saguaros are themselves creatures of amusing and intriguing design, and when in a saguaro forest the interaction of their shapes never ever bores me:


Poppy Collage Finished!

Jeez, this took longer than I expected: total size will be 16″x 20″:

It was really cold today, by Tucson standards, and it’s going to freeze tonight, so I couldn’t laminate the collage to silk organza (because the messy process is done in my backyard). I’ll have to do that after work one day this week when it’s warmer. Then I’ll have 2 in my series (the first is the prickly pear I made last month). I just made a stack of color photocopies of saguaro cactus; that will be the 3rd design in this series. Once all are done I’ll quilt them and then hopefully frame for a triptych.

I guess I’m sounding a bit confident: I’m assuming the above collage will laminate successfully, and that I’ll have similar success with the as-of-yet to be collaged saguaros. I’ll keep you posted!

New Paper and Silk Lamination Project

I started a new project today; this time, it’s poppies, a shape well known to me from my previous quilt. You can’t see it too well here, I’ll post a better photo soon; this is the first of 6 poppies:

I ripped up color photocopies of poppy photos I’d taken in my backyard the last few years; I’m making a collage of the photocopy pieces, and will transfer the completed image to silk organza.  Here are a few more of today’s poppies:

After looking at my work, I’ve decided the shape on the left is going to have to go; I think it’s best if the poppies kind of “match” and the one on the left has blue in the “wrong” places. For some reason, the old Sesame Street song “One of These Things Is Not Like the Other” came to mind as I tried to figure out what was bugging me.

I’ll post better photos tomorrow or the next day, my work day permitting.

Progress…

Tomorrow is my only day off this week. I have to work in my garden; it’s going to get warm here quite soon and I have beet and carrot beds to dig up and get ready for something for spring, which is a very short season around here. Maybe snow peas. We’ll see.

Yesterday I put a mitered border on the laminated silk organza piece I posted about a few weeks ago. I don’t know if this type of border really works for such a non-traditional bit of fabric….but this is just a sample. I’m going to quilt it within the next few days and see how it goes:

This is roughly 16″ x 22″.