Straightening Up the Art Quilt

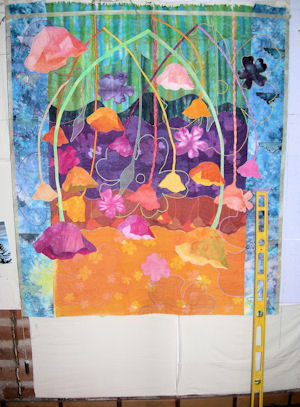
The level is on the right, and you can barely see the plumb line on the lower left corner; these are the most important tools in straightening up a large piece of fabric art. There isn’t exactly a T-Square that will work. For the first time I used masking tape to create a straight line after I’d measured carefully, and that turned out to be a helpful cutting guide rather than just drawing a line on the fabric.

I made a temporary hanging sleeve last night and hung up the piece, unfinished, to see how straight it looks; I was surprised at how relatively good it looks. I wanted to get an idea of how straight it was before sewing on the binding…..and then hanging it up….and then taking off the binding to straighten it up…..what a nightmare that is!

Bear in mind this is an old house, where there really are no reliable 90-degree angles, and that there’s some distortion in the photo:

I wanted to use this very cool fabric I dyed for the binding….

…but I don’t have enough! I went to a local fabric store and bought a yard of dark fabric for the binding. Which I plan on sewing on today….so stay tuned! I can’t believe this is almost finished.

Machine Quilting is DONE


Well, it’s all machine quilted! The image probably doesn’t look much different than it has for the past few months on this blog. But, trust me, it is different because every square inch is quilted!  Up close, a lot of it looks like this:

And for the past 4 weeks, my dining room table has looked like this:

And this:

The remote is important for channel surfing while sewing.

The last 5 days have been a real push to get it done. I had to take some time off to tend to the yard; we had a deep freeze (19 degrees F. at my house a couple nights ago) several days ago, and that means covering frost-sensitive plants and picking all the citrus. My tangelo tree was loaded with juicy tangelos, which, if exposed to frost, would make them dry and inedible. So, I picked them all:

Today it felt great to be done quilting (it’s taken me 4 weeks!).  I finally got my dining room table back:

And all my thread is put away:

Now I have to straighten up the piece, put on a binding, make a temporary sleeve and make sure it hangs straight….and then presto, I’ll be done!

Machine Quilting Marathon

What you’re looking at, above, is the back of my 54″ x 60″ art quilt. You’ll be forgiven if you can’t quite make out the machine quilting details, it’s not the best shot. Here’s a close-up of some of the madness:

As I mentioned in a previous post, my sewing machine is right-hand dominant; the “throat space” is on the right, the controls (this is an old machine, so, there aren’t many controls) are on the right. So, my right arm is feeling a bit of repetitive strain. Needless to say, since my machine-quilting marathon began 3 weeks ago, I’ve done little if any swimming, belly dance or fiddle-paying, all activities which require a cooperative rotator cuff.

Here’s some of the quilt front:

A close up:

All the hard stuff is done. While there’s still 20% to go, it’s mostly stippling on the edges, which is not very time-consuming. Today I had the Turner Movie Channel on in the background while I was sewing; today’s movie theme was Disney live-action films like the Parent Trap and Escape to Witch Mountain. I’m not kidding you, those movies were playing while I was sewing. I was also dealing with a migraine, so, creating a simple mood was key in getting anything done.

I hope I can get this thing to hang nice and straight when it’s done. THAT is a huge chore for any non-traditional quilt where there’s lots of distortion of the fabric.


Finished Quilt Top

Every minute I spend posting to this blog, I could be working on my art quilt….which is due January 11th at the local quilt guild meeting if I want it to be in the January Quilt Show.

This is what I had to work with around Thanksgiving: I was arranging the poppy appliques and trying to figure out where they looked best. There was an awful lot of pinning and re-arranging going on before I settled on where each flower looked best.
After looking at it for a while, I realized I was going to need a couple more poppies for the design to feel balanced. I made a couple of appliques at the dining room table; here you see the pieces cut out, but not yet sewn together:

And here’s the finished applique:

If I worked on this before dinner time, I got this look from the corgis in the house:

They are staring at the dining room table. Where I am sewing. Not eating, and not making them dinner.

This is how dinner looks:

Baxter eats about 1/4 cup of wet food and then conks out for a bit while Bearbear attacks his kibble and peanut butter filled Kong toy.

I lost a whole evening of sewing at Thanksgiving time making pies with that super-special lard I blogged about a few weeks ago; yum yum, here are 2 sweet-potato pies and an apple pie and they were DELICIOUS:

Then, upon further inspection of my art quilt, I decided that the satin-stitching wasn’t dense enough: in certain places, because I was using light thread on dark fabric, you could see the fabric through the stitch. So. I put stabilizer under all of my reverse applique poppy shapes and put down another layer of satin stitch on top of the existing stitch. It took FOREVER. I was going crazy. But, the end result is much better: you can’t see it too well here, but, the orange thread on the right side of the sewing machine needle is 2 layers of satin-stitch and the orange thread on the left side is just one layer:

In the photo, it looks insignificant; but trust me, the real thing looks greatly improved with my sewing due-diligence.

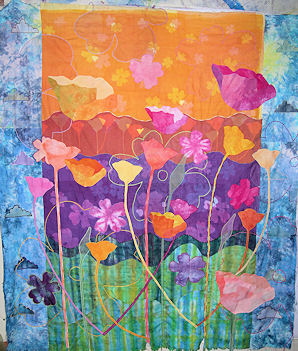
My goal was to have the quilt top done–absolutely done–by the end of November, so I could spend all December quilting. Which I hope will be enough time. Here’s the finished quilt-top: pressed, all bits of thread snipped, and looking pretty darn good:

I met my deadline! I’ve already sewn together my muslin backing for the quilt, gotten my batting; I’ll put the quilt sandwich together Friday and get quilting this weekend.

Wish me luck. And just a few chiropractic visits.

Quilt Top Is Almost Finished

Progress is bleeping slow, that’s all I can say. Having a day job and trying to get an art project done right now seem to me to be mutually exclusive occupations.

Tonight I finished all the “couching”, which is sewing down yarn around the unfinished edges of reverse applique.

Here’s a reverse applique with unfinished edges:

And here it is with yarn sewn down around the edges:

On the back, you can see the bobbin thread on the tear-away stabilizer;  I used sheer polyester thread for the topstich. Polyester is the good invisible thread; nylon is the bad invisible thread (it turns yellow over time).

I then tore away the stabilizer, as the name of the product suggests; all of the layers of the quilt top are quite evident here:

Voila: here it is, everything is DONE except now placing the appliques, which I’ll do over the next few weeks, and hopefully get started quilting this thing by Thanksgiving. There will be about 5 desert poppy appliques placed on top of this design when it’s done:

Dogs, bees and yarn


It’s the end of a quiet Sunday here in Tucson.

Here’s Bearbear and Baxter as we work together on their sit-stays. We met with a really nice trainer, Mary Ann Coleman, who came to my house last week and helped us sort some things out; she great, reasonably priced, and she’s been doing work with dogs for decades. Baxter has been here a month and we’ve had to work out a few wrinkles. He’s a good dog, but introducing a new dog to the home means we all have to work on a few small details. For example, when I’m getting ready to take the dogs for a walk, I want them to both sit calmly and wait while I get my shoes on, not run around in a crazed frenzy. Now, they both have a good sit-stay while I get ready to take them for a walk.

I also checked on the bees today for the first time in 2 months; the size of the hive seems the same, and I guess I should just be happy they made in through the second-hottest summer on record.

Here’s the inside of the hive:

The entrance on the upper left-hand corner of the photo; the bees have built up comb on the bars on that side, but they still have plenty to grow on the right side:

I was worried about evidence I saw of wax moth larvae on the bottom of the hive; I sent a message to the fellow who built my hive, asking for advice about this:

And here’s a close up of 3 bars of comb in different stages of growth…

as well as some evidence of yucky moth stuff–the white glop there on the bottom. I’ll learn soon if I have to worry about this or not.

I also dyed some yarn today for my quilt:

Delayed by the Art Quilt

Well, I’ve been clearly not posting anything new; but as you can see above, I’ve spent some time working on my art quilt, instead. I’m making progress.

My sister visited recently and suggested I use some pale colors and bright pink colors in large poppy appliques to help the design. I realized I had few fabrics dyed in this color. I tried to make new appliques work with my fabric on hand, but I couldn’t make it work and finally gave up, frustrated. I decided I’d have to spend some time dyeing new colors. Not that dyeing fabric is time consuming–it isn’t–but every hour counts right now because the deadline to submit a photo/application is this Wednesday for entry into January’s Tucson Quilt Show. So I’m spending all my free time getting it ready to photograph.

The first thing I did was tear my favorite quilting fabric–cotton sateen–into small pieces, most about the size of fat-eighths. I then got all the fabric wet in a bucket of water…

…and then wrung out the fabric and scrunched into damp shapes that would fit in the bottom of a quart plastic yogurt container, my preferred container for dyeing. The fabric was scrunched in one of 4 shapes which you can see below, from left to right the shapes are: the general scrunch shape, the spiral twist shape, the sloppy pleat shape and the wadded-up ball shape. They each produce a unique pattern of dye.

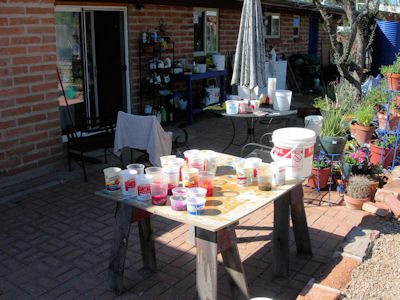
Outside on my patio this morning, here are all the containers ready to go…

I added liquid dye to each container; I mixed 5 colors and combined them differently for each one. I use Procion fiber-reactive dyes that are set with soda ash, and I get all my supplies at Dharma Trading Company.

Bearbear and Baxter were there to watch (quietly). Poor Baxter, he’s slapped daily by Bearbear’s tail, seen here wagging in a blur; his tail  is exactly at Baxter’s eye-level. Baxter doesn’t have a tail. 🙁

After 90 minutes I topped each container off with about half  a cup of warm soda ash solution:

Then I squeezed out the dye I could, then swirled each piece around a bucket with Synthrapol, a detergent that separates dye molecules in the water so the dye doesn’t move from fabric to fabric. Even so, many people recommend rinsing fabrics separately when you remove them from the dye bath. I haven’t had any problems letting the fabric touch at this stage; the soda ash has fixed most of the dye, too.

Then I put all the fabric–lights and darks–into the washer together. I add a small amount of S and use hot water. Then I’m done!

The fabric looks fabulous. I’m pressing it when I done posting this!

Progress….

Here you see 4 new poppies from the last time I posted about my art quilt; clearly, I’ve gotten my machine back!

Here’s a close-up of the 4 new flowers. Reverse applique. And I completed all the zig-zag stitching on the appliques, too; but I had a few struggles with a 50 weight rayon thread that kept breaking, it was a type of thread I hadn’t tried before. With a new needle and lower tension, things improved, but on this purple flower I feel the satin-stitching is a bit lumpy and stressed:

Things look a lot better on the orange poppy, the satin stitch is nice and smooth:

No matter; it’ll work in the end!

I figure I have to make 7 more reverse applique poppy shapes…..