Reverse Applique Progress

This is how my piece looks so far; I’ve reverse appliqued 11 cloud shapes so far, 8 more to go. If you look carefully you can see 3 white cloud shapes, those are pattern pieces which I’m “auditioning” to see where clouds will look good on the remaining available quilt surface. This is a better view:

The surface looks a bit crooked because the fabric isn’t lying flat against the wall; the fabric that’s laminated is stiff and has no drape, so I have to really smooth it down to get an accurate read on the surface. I’m feeling confident it will quilt well, though.

I was distracted for a day with the 12 pounds of cherries I got at the store on sale recently; I used them to make a pie with the last of the lard from Prairie Pride Farms, it is THE best lard and it’s worth every penny:

It took me a few hours, it seemed, to pit all the cherries; in the end, enough for 3 pies. I had to freeze 2 pie’s worth because I don’t have any more lard, and according to the Prairie Pride website, they aren’t shipping until September, when it may cool down after the hottest summer on record.

It’s good I didn’t bake 3 pies or I probably would’ve eaten them all myself. I can’t tell you how good it turned out: check out the flake on the crust:

Recipe:

Pie crust for 2 pies

4 1/2 cups pitted cherries tossed with 1 cup sugar, 2 Tbsp. lemon juice and 4 pinches cinnamon. Toss these ingredients, then add 1/2 cup flour and 2 Tbsp cornstarch. Put in pie crust, use egg wash to anchor down the lattice strips cut from the second pie crust. Bake for 1 hour at 350. Cool on a rack to keep crust flaky and firm.

Cloud Catastrophe: Sewing in the Clutch Averts Disaster

I left my camera in my brother’s car for a few days and wasn’t able to post any photos of progress on my art quilt.

Of course, the other reason I wasn’t able to post is because I hit a huge impediment. Part of my design includes 19 clouds–to represent the 19 victims of the January 8 shooting who survived; the clouds will each be cut out of my quilt top using reverse applique. Last weekend, I cut out my first cloud, and used satin stitch around the reverse applique:

OMG. Yuck. I was so disappointed. It was just to hard for me to roll up my quilt top and maneuver it through my machine to keep the satin stitch smooth, instead the stitch was all jerky. This cloud will not do; it’s just unacceptable. I needed a solution.

So….as so often is the case, when one applique fails….apply another applique on top to cover it up. I drew another cloud around my failed cloud…

…and pinned some fabric to the back and cut out that cloud shape, neatly disposing of the failed cloud. 🙁

I needed a new method of cover up the seam of my new cloud. What to do. I thought of trying free-motion zig-zag, but then I thought I’d try out my new Juki and used free-motion straight-stitch to sew circles and curls over the seam, which will keep it from fraying.

I cut out a sample cloud with same sample paper-laminated fabric for the inside and some hand-dyed yellow cotton on the outsdie. The laminated fabric is from a photo I took of the Vietnam War memorial on the National Mall.

Here’s a closeup. I liked the way it looked.

So I used the technique on my new cloud; here it is, fresh off the machine and still in it’s embroidery hoop.

Here’s a close-up:

One cloud down, 18 more to go!!

Structural Delay

I ran into a bit of a structural problem while sewing the pieces of my art quilt top together. Some of the panels in my piece are cotton sateen; other panels are cotton sateen covered with acrylic gel medium….so those panels are stiffer. I used satin stitch to sew these different panels together. After a few times squashing my rolled up quilt top through my sewing machine, I noticed that the fabric was tearing in small places along the satin stitch seam line, but only the fabric that was stiff was tearing a bit. I realized that the mulitple needle punches that make up satin stitch were actually acting like a perforated line on that fabric. I needed a solution, quick. Above, you can see (faintly) a tear in the fabric on the top of the seam, on the left side.

I fused about a yard of Wonder Under onto about a yard of muslin; then I cut out the wavy shapes of the seams from the muslin/fused fabric, and then actually ironed the fused fabric onto the back of the quilt top. If you look carefully at the photo below, there is a faint neutral colored area on the bottom side of the seam, on the left side, just above the letter T. Part of that creamy colored area is the fabric itself, but the smaller area near the seam is the muslin. And believe me, it’s hardly noticeable.

It took a while to do this as it was rather tedious and it put me in a bad mood.

This is my piece so far, the square window shapes haven’t been assigned permanent locations yet:

Piece of Mind

As I reported earlier, I’m busy piecing together the top to my January 8th art quilt. Haven’t come up for a name yet for the project. This is bottom 3/4 of the quilt, it measures 62″x52″:

So, once everything is pieced together, I will use reverse applique to cut out shapes from the top. I will need a vertical border on each side of the top. I don’t think a horizontal border is necessary, but 2 verticals will be nice I think. I dyed some yardage today, so I’d have enough for 2 strips for either side; the quilt will be about 7 feet tall when done. I want more saguaros, to connect the political message with the unique nature of Tucson, and what’s more unique than a saguaro?

In this quilt, I’ve used only 8 colors of procion dye: 2 yellows, 1 red, 4 blues and gray. By sticking to the same palette for the entire project, there is more unity and I get variety by mixing the primary colors in different proportions.

For the border fabric, I took an 8 foot length of sateen, scrunched it up in a large plastic tub and poured different color dyes to create a gradation of sunset-type colors:

The fabric turned out okay, but it needed more Ooomph.

The most interesting hand dyed fabric is dyed several times, to create layers. To try something different  I screen printed a color remover onto my dyed fabric. I used thiourea dioxide, an easy to use chemical, much safer (for people as well as for fabric) than bleach, and followed the directions (somewhat) on the link just mentioned, which describe how to add the chemical to print paste. The bigger containers below have plain print paste, which I always have in the back of my fridge so I can screen print at a moment’s notice.

Here you can kind of see the saguaro shapes screen printed onto the dyed fabric, with debris from the storm in the background.

You know, the directions in the link I mentioned state to steam the dried print paste (a steam iron is fine) to set the color remover. I didn’t do this. I just let the fabric sit and dry out in the hot, hot sun for 30 minutes and after this, I tossed the fabric in the wash. This is how it looks:

I really like the effect. I’m going to dye it more tomorrow. Here’s how it looks “auditioning” as a border on the left side of my pieced top:

So far so good! This was a very productive day, but I felt sad about my palo verde tree: it’s going to have to go. Here’s what it looks like now, it’s falling over a bit more, just a few days ago it was completely perpendicular to the ground!

Looks like I’m going to need a chainsaw. Or, more accurately, someone to use a chainsaw for me!

Let the Piecing Begin…

I’m taking some time off from work to get some sewing done; so far so good. I started piecing together all the bits of fabric I’ve made over the past 6 months or so, this fabric will be my “quilt top” so to speak. This is the first section:

I pieced the 3 sections together with a straight stitch and then satin stitched over the seam; here you can see a close up here I’ve satin stitched one seam, not the other:

Here you see both seams are done:

Here is my project as it evolves; more later!

Paper and Cotton Capitols

I got a cortisone shot in my shoulder so I’m feeling better in that arena of life; nothing like joint mobility. I’m still fussing at getting my laptop set up; that takes so much time.

I laminated some photocopies of the US Capitol building onto some hand dyed cotton sateen today. First I figured out where on the fabric I wanted the photo to be centered; then, I turned the paper over, taped it in place, and then brushed acrylic gel medium on top of the fabric to transfer the pigment to the cotton:

Here are several sizes of US Capitol building photocopies waiting for their fabric assignments:

Here’s one finished piece, which is about 8 inches wide:

This one is much smaller:

Eventually, these small pieces of fabric will be used for small cloud-shapes in my quilt project. I’m planning on 19 small clouds.

Techno Snafus and Delays

I got a new laptop a few weeks ago and finally unpacked it and set it up. I’m hardly a techie, but I’m not completely incompetent either; that said, I’ve asked a colleague’s husband–who has a small business helping people w/their computer networks–to come over this weekend to help me get my backup hard drive to talk to Windows 7, and to also help me with a new wireless router. I’ve spent way too much time online troubleshooting.

I did also finally get a cortisone shot in my shoulder which has so far only made things much better.

This past weekend I made some more fabric for my January 8 quilt project. Here I have enlarged photocopies of the text of a famous RFK speech, I’m kind of arranging them on my dining room table while the Giant’s game is on, trying to figure out the best layout for them…

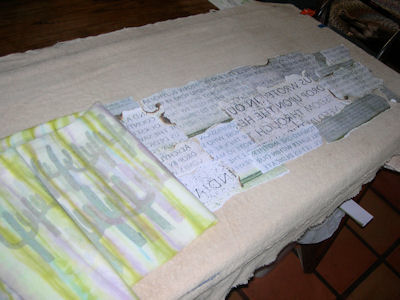
..because they’ll be laminated onto a bit of saguaro fabric yardage I made a few weeks ago. Here is the collage of text, arranged on a bath towel stretched over a piece of plywood. The green fabric is slowly being placed over the paper and then pinned down to keep it all in place:

As you can see some of the paper is burned on the edges. That was done in the kitchen, because I could use the exhaust fan over the stove; it was way too hot and windy outside. You can see what a mess my stove was when I was done. The wet towel is there to put out any errant flames.

Here is the fabric pinned to the towel-covered plywood in my “wet studio” on my patio. I later screen-printed acrylic gel medium on top of the fabric to transfer the text.

I also finally got the sewing machines dusted off, oiled up and running again. I wanted to see how the laminated fabric does as revere applique, here is a blue piece of fabric (top) and the laminated fabric on the bottom. I sewed a curving line on top of the blue fabric, then cut away to revel the laminated fabric underneath:

Here’s how nice my old Riccar looks in it’s fancy new ergonomic home, it’s very comfortable to sew:

The fabric with the laminated text turned out great, will post that next time.

Taking Shape….

This is a very vague mock up of some of the fabric I’ve put together for my new piece:

I really like the fabric on the bottom, here’s a close-up: I’m tired of cutting out contact paper shapes, that’s for sure.

I experimented a bit with pleating some yardage and dyeing just one side, to get some vertical shapes: here’s the pleated fabric and the tub of water for the partial dye-bath:

And here’s the fabric actually in the dye bath:

This is a nice technique to use to get vertical stripes, and it’s something I learned from a book by Claire Benn and Leslie Morgan. I had to do this four different times with four different colors to get the vertical striped fabric you see in first photo above.

Soon I’ll be able to sew all the fabric together for the quilt top. Very exciting!

44th Anniverary of the RFK Assassination

Tomorrow is the 44th anniversary of RFK’s assassination. Very sad to think about that, and how things would be different now if he had lived. His words are going to be a powerful part of my January 8th piece I’m working on now.

This is how my latest paper lamination turned out, I think it has real potential. I mad a collage of photocopies of photos I took of the RFK grave site at Arlington National Cemetery and laminated them on top of some saguaro fabric I screen printed last year with a thermofax screen.  I burned some of the photocopies. Here’s a close-up:

I feel less enthusiastic about the mountain fabric, here it is layered on top of more mountain fabric:

I’m slowly getting all the fabric together…soon this piece will start coming together because I have the finished work in mind. More screen-printing ahead this weekend!

Latest Fabric Designs

I don’t mind the trial-and-error involved in art making; I just prefer the trial part, it always seems more open ended at least. The error part stinks!

Last weekend I made some fabric that didn’t turn out as well as I hoped. Drat!

I had this idea to make fabric with a large mountain motif. Here in Tucson, the Catalina Mountains are a familiar sight, so I drew a large shape of the mountains and then traced it onto contact paper (what you’d use for kitchen shelving) using my “light table” a.k.a patio door:

Here is a rather dim view of what the contact paper shapes (white) look on white fabric out on my patio on a hot day when the glare from the sun, even on my patio, made everything seem very white:

Here are the same shapes with dye screen-printed on top. Warm weather is very good for dyeing. The 4% ambient humidity might frighten some folks who dye, but I find that by adding enough urea to my dye solutions, that seems to be just enough of a wetting agent. As I’ve said before, I don’t batch my dyed fabric. It’s usually sun-dried and tossed in the washer within hours of being dyed.

I usually have better luck, but the above fabric didn’t turn out very well. I was planning on getting a fabric that I’d screen-print again, but what I got isn’t worth it. Sigh.

Though before learning the outcome (before it went in the wash) I made some foccacia, following a recipe in The Olives Table cookbook which I just got as a gift from my Aunt Mary. I find making some yummy food in the middle of a day of art making feels very luxurious. The focaccia recipe in that book is fantastic, here are how mine looked, slathered w/olive oil and peccorino romano and about 5 minutes from being done:

Anyway, a whole work week went by and today I picked up from where I left off, this time trying a different spin on the whole mountain theme. Here we have a panorama view of the Catalina mountains, made from color photographs photocopied and then taped together. I burned the edges of the bottom one and will do the same for the top one, as I like the effect:

Here they are on top of some previous screen printed fabric, also of the Catalina mountains. My plan is to laminate these photocopies onto silk organza, and then to layer the silk over the original fabric:

This is the roughly 20″x30″ piece of organza, pinned down on foam core with one of those contact-paper mountain shapes stuck on top. Not giving up on that idea! This fabric was screen printed this afternoon but not washed. Since it’s a sheer, and since the yardage is smaller, I’m hoping for a better outcome since the effect is supposed to be subtle. We’ll see tomorrow!